
使用 Schematics 自定义 ng generate
使用 Schematics 自定义 ng generate
导言
-
本文将介绍哪些类容
- 什么是 Schematics,以及它与 Angular CLI generate 的关系
- 如何创建一个 Schematics 项目,以及如何使用 Angular CLI 调用
- 创建一个自定义的 Component schematic
- 如何定义 ng-add 和 ng-update
-
词汇解释
- Schematics: 用于描述 generator,对现有的文件系没有副作用
- generator: Angular CLI 生成器,用于执行 Schematic 生成或修改代码
- Collection: 用于定义 Schematics 列表,之后可以按 Schematic 的名称调用
介绍
Schematics 是什么?
Schematics 是现代前端开发工作流的工具;它可以将变化应用到你的项目中。比如创建一个组件、添加配置项、将框架添加到现有项目,或者更新你的代码来修复更新依赖时带来的 break change。 Schematics — An Introduction
如何使用?
就和我们常用的 ng generate component [name] 一样,Angular6 允许三方库自定义 Schematics,现在 NG-ZORRO 对其做了支持,比如你现在就可以在 Angular6 的项目中试试:
ng add ng-zorro-antd将 ng-zorro-antd 添加到你的项目中ng g ng-zorro-antd:layout-top-side --name=[name]创建一个顶部侧边栏布局的组件
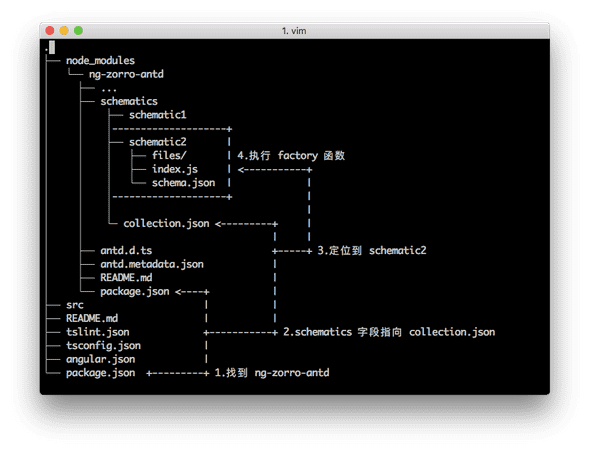
Angular 是如何找到它的?
下面这张图说明了当我们输入 ng g ng-zorro-antd:schematic2 时,Angular 如何找到对应的 schematic。
起步
首先需要安装全局依赖
$ npm install -g @angular-devkit/schematics-cli之后使用下面的命令新建一个 scheamtics 项目
$ schematics schematic --name my-schematics
$ cd my-schematics
$ npm install
看到下面的信息就成功创建了一个 Schematics 项目
编译 Schematics
运行下面的命令编译 ts 文件,并使用 npm link 将 schematics 链接到全局
$ npm run build
$ npm link
使用 Angualr CLI 运行
新建一个 Angular 项目,并且将刚才的 schematics link 入进来。
$ ng new schematics-test
$ cd schematics-test
$ npm link my-schematics
之后使用 ng generate 命令来运行 schematics
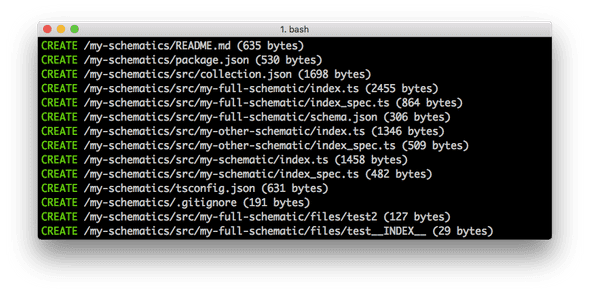
$ ng generate my-schematics:my-full-schematic --name hello现在你应该可以看到 Angular 项目目录多了几个文件
现在我们已经知道如何在 Angular 项目中运行自定义 schematics 了,现在我们来创建一个 Component Schematics
创建一个真正的 Component
因为官方 API 还处于未完成状态,所以我们先将 material2/src/lib/schematics 下的 utils 文件下载拷贝到 my-schematics/src 下。
然后安装一下新的依赖
$ npm install parse5 @schematics/angular --save-dev接下来按照下面目录结构新建一个名为 my-component 的 schematic。
.
├── node_modules/
├── src
│   ├── utils
│   ├── my-component
│   │   ├── files
│   │   │   └── __path__
│   │   │       └── __name@dasherize@if-flat__
│   │   │           ├── __name@dasherize__.component.__styleext__
│   │   │           ├── __name@dasherize__.component.html
│   │   │           ├── __name@dasherize__.component.spec.ts
│   │   │           └── __name@dasherize__.component.ts
│   │   ├── index.ts
│   │   ├── schema.json
│   │   └── schema.ts
│   └── collection.json
├── README.md
├── package.json
└── tsconfig.json
修改下面的文件
collection.json
collection.json 中包含了我们提供的每个 schematic 位置。
factory字段指向需要执行的文件和方法 (一般来说是index.js中被export default的方法)schema字段指向一个 JSON Schema 格式的 json 文件aliases这条命令的缩写,比如ng g component [name]可以缩写成ng g c [name]
{
  "$schema": "../node_modules/@angular-devkit/schematics/collection-schema.json",
  "schematics": {
    "my-component": {
      "description": "Create a  component",
      "factory": "./my-component/index",
      "schema": "./my-component/schema.json",
      "aliases": ["mc"]
    }
  }
}
schema.json
这个文件非常重要,其中 properties 字段定义了该命令的输入项(比如 --name),以及一些参数的默认值。
{
  "$schema": "http://json-schema.org/schema",
  "id": "MyComponent",
  "title": "My Component Options Schema",
  "type": "object",
  "properties": {
    "name": {
      "type": "string",
      "description": "The name of the component.",
    },
    "prefix": {
      "type": "string",
      "format": "html-selector",
      "description": "The prefix to apply to generated selectors.",
      "alias": "p"
    },
    "styleext": {
      "description": "The file extension to be used for style files.",
      "type": "string",
      "default": "css"
    },
    "spec": {
      "type": "boolean",
      "description": "Specifies if a spec file is generated.",
      "default": true
    },
    "flat": {
      "type": "boolean",
      "description": "Flag to indicate if a dir is created.",
      "default": false
    },
    "selector": {
      "type": "string",
      "format": "html-selector",
      "description": "The selector to use for the component."
    }
  },
  "required": [
    "name"
  ]
}
tsconfig.json
{
  "compilerOptions": {
    "baseUrl": "tsconfig",
    "lib": [
      "es2017",
      "dom"
    ],
    "module": "commonjs",
    "moduleResolution": "node",
    "noEmitOnError": false,
    "skipDefaultLibCheck": true,
    "skipLibCheck": true,
    "sourceMap": true,
    "target": "es6",
    "types": [
      "jasmine",
      "node"
    ]
  },
  "include": [
    "src/**/*"
  ],
  "exclude": [
    "src/**/*/files/**/*"
  ]
}
index.ts
这里的 buildComponent 是官方包 utils 中包含的,但是还没有单独发布,这里是直接拷贝出来的。
import { chain, Rule } from '@angular-devkit/schematics';
import { Schema } from './schema';
import { buildComponent } from '../utils/devkit-utils/component';

export default function (options: Schema): Rule {
  return chain([
    buildComponent({ ...options })
  ]);
}
schema.ts
import {Schema as ComponentSchema} from '@schematics/angular/component/schema';

export interface Schema extends ComponentSchema {}
模版文件
下面几个文件奇怪的路径、文件名、以及内容将会被 @angular-devkit/schematics 的 template<T>(options: T) 方法解析,将参数应用到模版内容及路径。
__name@dasherize__.component.ts
import { Component } from '@angular/core';

@Component({
  selector: '<%= selector %>',
  templateUrl: './<%= dasherize(name) %>.component.html',
  styleUrls: ['./<%= dasherize(name) %>.component.<%= styleext %>']
})
export class <%= classify(name) %>Component {

}
__name@dasherize__.component.html
<h2>My Component</h2>__name@dasherize__.component.__styleext__
h2 {
 color: red;
}
__name@dasherize__.component.spec.ts
import { fakeAsync, ComponentFixture, TestBed } from '@angular/core/testing';

import { <%= classify(name) %>Component } from './<%= dasherize(name) %>.component';

describe('<%= classify(name) %>Component', () => {
  let component: <%= classify(name) %>Component;
  let fixture: ComponentFixture<<%= classify(name) %>Component>;

  beforeEach(fakeAsync(() => {
    TestBed.configureTestingModule({
      declarations: [ <%= classify(name) %>Component ]
    })
    .compileComponents();

    fixture = TestBed.createComponent(<%= classify(name) %>Component);
    component = fixture.componentInstance;
    fixture.detectChanges();
  }));

  it('should compile', () => {
    expect(component).toBeTruthy();
  });
});
编译运行
现在运行 npm run build 编译我们的 schematics。
切换到 Angular 项目中试一试:
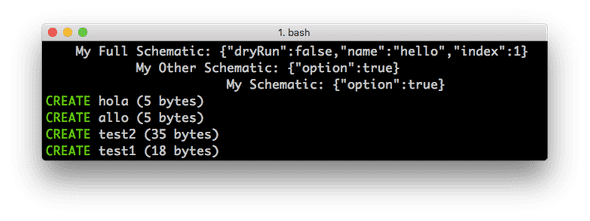
$ ng g my-schematics:mc --prefix app --styleext less --name test-component不出意外的话你因该可以在控制台看到这样的信息。

下面是我们传入的几个参数,它们在 schema.json 中被定义。
styleext参数为样式文件的扩展名prefix参数为组件 selector 的前缀name参数定义组件名
之后我们就可以定义一些布如局、表格、表单等常见的义务组合组件或者服务。
ng-add
作为 Angular6 新特性之一 ng add [package name] ,让我们可以跟方便的添加三方库。
其实 ng add 也是一个 schematic,只是在 collection.json 中有一个固定的名称 ng-add ,当用户使用 ng add [package name] 时,Angular 会用这个固定的名称找到对应的 schematic,就像这样:
{
  "$schema": "./node_modules/@angular-devkit/schematics/collection-schema.json",
  "schematics": {
    "ng-add": {
      "description": "add NG-ZORRO",
      "factory": "./ng-add",
      "schema": "./ng-add/schema.json"
    }
    ...
  }
}
在 ng-add 中我们可能要做这些事:
- 将添加依赖到
pagkage.json - 配置用户的
app.module.ts - 配置用户的
angular.json
在 utils 中已经有几个现成的方法供我们使用,下面是从 ng-zorro-antd 中截取的几段代码。
/** 把 NG-ZORRO 添加到 package.json */
function addZorroToPackageJson() {
  return (host: Tree) => {
    addPackageToPackageJson(host, 'dependencies', 'ng-zorro-antd', zorroVersion);
    return host;
  };
}

/** 把需要的 module 添加到 app.module */
function addModulesToAppModule(options: Schema) {
  return (host: Tree) => {
    const workspace = getWorkspace(host);
    const project = getProjectFromWorkspace(workspace, options.project);

    addModuleImportToRootModule(host, 'BrowserAnimationsModule', '@angular/platform-browser/animations', project);
    addModuleImportToRootModule(host, 'FormsModule', '@angular/forms', project);
    addModuleImportToRootModule(host, 'HttpClientModule', '@angular/common/http', project);
    addModuleImportToRootModule(host, 'NgZorroAntdModule.forRoot()', 'ng-zorro-antd', project);

    return host;
  };
}
当你运行 ng add ng-zorro-antd 是,你会看见下面的文件被更新了。

下面是一些其他库 ng add 的 schematic:
ng-update
与 ng-add 同样是个 schematic,不同在于它不在是个固定的名称,而是一个单独的 collection 文件,因为会有多版本的情况存在。如果版本之间存在 break change 的话,库开发者就可以修复这些 break change。
首先我们需要新建一个 collection 文件,命名为 migration.json(名字不重要)
CLI 会根据本地的版本判断执行哪个 schematic,如果相差多个版本会依次执行多个 schematic。
migration.json
{
  "$schema": "./node_modules/@angular-devkit/schematics/collection-schema.json",
  "schematics": {
    "migration-01": {
      "version": "0.7.0",
      "description": "Updates to 0.7.0",
      "factory": "./update/0_7_0"
    },
    "migration-02": {
      "version": "1.0",
      "description": "Updates to 1.0",
      "factory": "./update/1_0"
    }
  }
}
然后在 package.json 中指定位置
package.json
{
  "version": "0.0.0",
  "schematics": "./src/collection.json",
  "ng-update": {
    "migrations": "./src/migration.json"
  }
}
之后在执行 ng update [package name] 时,Angular CLI 会根据当前版本执行对应的 schematic。例如当前版本是 0.7.x 就会执行 migration-02 升级到 1.0.x;如果当前版本是 0.6.x 则会先执行 migration-01 再执行 migration-02。
还可以使用 --form --to 参数来制定升级的版本 ng update [package name] --to=1.0。
结语
我们讨论了 Schematics 的定义方法以及如何在 Angular CLI 中调用,顺便也了解 ng-add 和 ng-update。但只是一些很简单的用法,你还可以使用 TypeScript API 以及 HTML 解析去实现更高级的 schematic,比如注入服务,在现有 HTML 中插入组件,插入的 Mock 数据等等…
本文没有介绍 Schematics API 的相关用法,因为截止 v0.6.3 版本,Schematics 还处于未完成状态,有机会会单独介绍 Schematics API。谢谢大家!